|
GETTING
STARTED
$300 buys all the material you need to construct the ultimate tool
stand. We used 3/4-in. MDF to build ours.
The only tools you need are a circular saw, a router, a drill, a
tablesaw and an accurate straightedge. A pneumatic nail gun makes
assembly a lot easier.
Butt
Joints, screws and glue make for simple, sturdy construction.
DIMENSIONING THE TOOL STAND
There are two things to consider when dimensioning your tool stand:
1. The height of the bed on your chop saw.
2. The height of your tablesaw.
The tool stand consists of two boxes permanently fixed to the top
to form a tool well (Fig. A). The
4-1/2-in. height of each box was determined by the height of our
chop saw’s bed mounted on a 1/2-in. plywood base. Adjust the width
of the ribs (C5) to match the height
of your own chop saw. The 34-in. height of the tool stand is just
below our tablesaw so it can be used as an outfeed table. If you
need a different height for your saw, adjust the length of the sides
and dividers (C2) accordingly.
ACCURATE MACHINING OF PARTS
Any part that’s a little bit out of square or not exactly the
right size will have a ripple effect on the outcome of this project.
Sides and dividers that are not square or exactly the same size will
result in an uneven top. Out-of-square tops and bottoms make for
poor-fitting inserts.
THE SQUARE TEMPLATE
Here’s a recipe to guarantee square, perfectly sized parts:
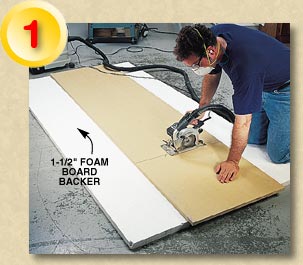
First, rough
cut the tops, bottoms and sides about 1/2-in. oversize with a circular
saw (Photo 1). Then rip all the pieces to finish width on your tablesaw.
Organize your work so the fence is set just once for each dimension.
This guarantees that every piece is exactly the same width.
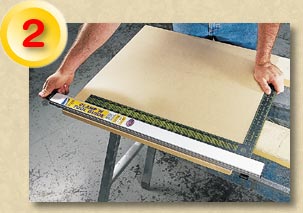
Each piece
must be crosscut perfectly square. One surefire way to get a square
end is to use a straightedge and a router with a flush-trim bit
(Photo 2). Once you’ve created a perfectly square 24 in. by 72-in.
piece, use it as a template for routing the other three 24 in. by
72-in. pieces. Simply clamp the finished piece over the rough one
making sure the edges are exactly flush and the ends to be cut
overhang about 1/4 in. Then trim the ends with a router and a
flush-trim bit.
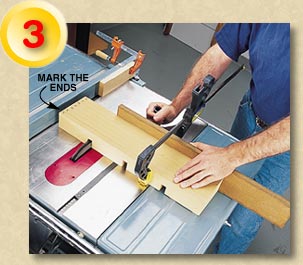
Use a 24 in.
by 24-in. piece as a template for trimming the ends of the other 24
in. by 24-in. pieces. The smaller parts can be accurately cut on
your tablesaw or chop saw.
USE THE CARCASS AS AN ASSEMBLY TABLE
There are two problems with building a large torsion box:
| 1. |
It will only be as flat as the surface you build it on. |
| 2. |
It can be a bear to clamp up. |
We’ve
solved both of these problems for you.
Create a flat surface on which to build the torsion box by building
the carcass first. Assemble the carcass top, bottom (C1)
and sides (C2) using glue and screws.
The dividers (C2) are fastened with
screws only, so the interior divisions can be altered for future
needs. Be sure all the edges are flush as you build. Use a perfectly
square back (D4) to square up the
cabinet. Laid on its back, the assembled carcass now provides the
dead-flat surface needed to build the torsion box.
|