| topics |
| back to shop |
| home |
| |
| shop: tail vice |
|
Shop-built tail vice
Sunday November 9, 2003 My workbench has been needing a tail vice for years. The $180 Veritas twin-screw tail vice is exactly what I wanted, but my budget did not have room for it, so I opted for this shop-built solution. I started with two 3/4" pipe clamps and a 36" pipe, threaded on both ends. Combined with some scrap wood, screws, glue, hardware and a few hours, I ended up with this: 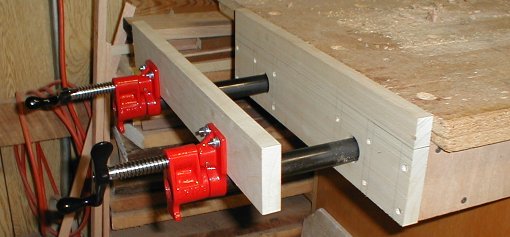 The clamps came from Harbor Freight, on sale for $3.50ea. The pipe was about $4. With the various screws, nuts, bolts and scraps, I figure I came in well under $15 for this vice...and it works pretty well. Of course, I've never had the pleasure of working on a Veritas twin-screw vice. Previously, I was using a pair of small clamp-on machinist vices...this is a BIG improvement. Here is my first use: holding a bench stop for a planing operation: 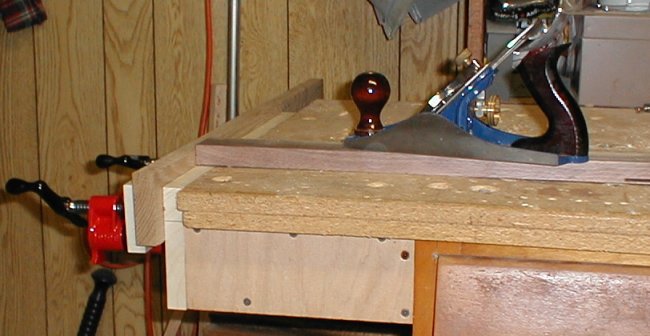 The first problem to solve was a strong support for the vice. As shown in the pictures, the tail vice was placed on an overhang at the end of my bench...which consists of two layers of particleboard. This is not particularly strong, so a sub-structure was required for rigidity. Also, since the workbench top is replaced occasionally, I wanted to minimize the effort of moving the vice to the new top. Here is what the entire vice assembly looks like before installing below the benchtop overhang: 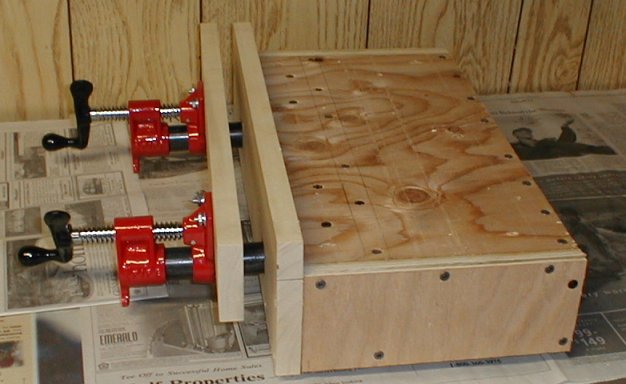 and here is the view from below: 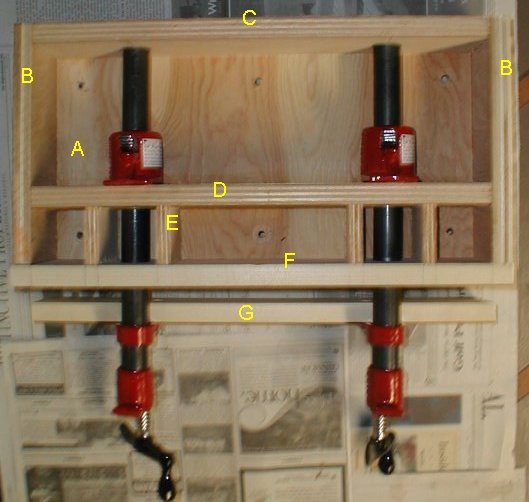 In the above picture you can see the complete assembly. The top (A) is a sheet of 1/2" plywood. This sides (B), back (C) and clamp-support (D) are 3/4" plywood. The face-support blocks (E) are 1/2" plywood. Maple or some other hard-as-a-rock wood are popular choices for the faces of the vice (stationary F, moveable G), but I chose tulipwood (yellow poplar) because it is strong but relatively soft, so it is less likely to scratch or dent my workpiece. The stationary face (F) is the only part of the assembly that is not glued...just screws for easy replacement in the future. Note that there is several inches of pipe behind the rear part of the pipe clamps. This allows the rear clamps to be moved back and the pipes extended for greater vice capacity, as shown here: 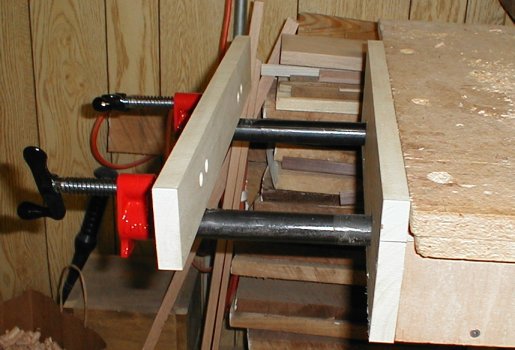 The greatest difficulty of this project was how to attach the moveable face to the clamps. I decided to drill the clamps for two bolts that are countersunk in the face (you can see the 4 counter-sunk holes on the face above). The nuts are visible in the photo below. The clamps are made from a soft cast iron, which is easily drilled. 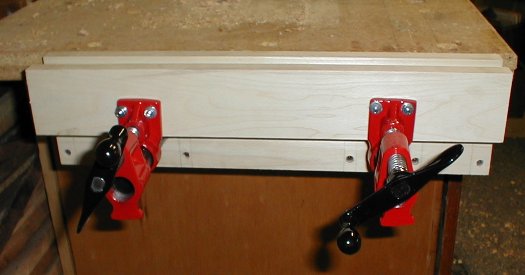 So far, I'm pleased with the
results. I've already used it for a number of clamping operations
and it has performed as expected.
|
