| topics |
| back to shop |
| home |
| |
| shop: Bigafence |
|
Most Unifence owners love the flexibility and accuracy of Delta's innovative fence. But many of us bemoan the inability to use simple sleds and jigs because of it's unique shape. One of my primary design goals was an add-on that would not prohibit the use of the built-in ruler. I have become accustomed to the accuracy it provides and do not want to lose that feature. Additionally, I would like to avoid drilling or cutting the fence. Lastly, I would like it to be easily removed (i.e. not permanent). I spent a lot of time working out designs and had a lot of good ideas - but a method of securing it easily to the fence eluded me. One day I discovered that the head of a 3/8" carriage bolt fits nicely into the two slots that are used to secure the fence to the carriage. Then came a sudden epiphany: with the fence horizontal (instead of the usual vertical position), one of the slots was available for securing add-ons to the Unifence! In hindsight, it's really pretty obvious. The resulting design is simple to construct, install and remove. It provides a 3.5x6" rectangular shape that easily accepts sleds and jigs. 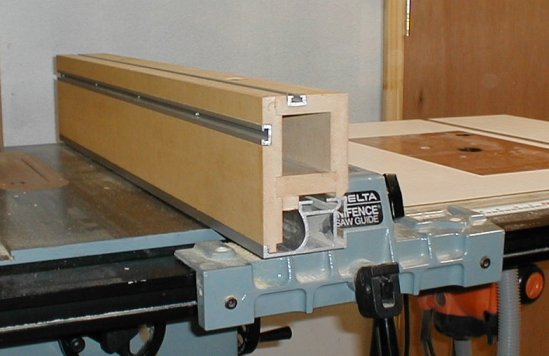 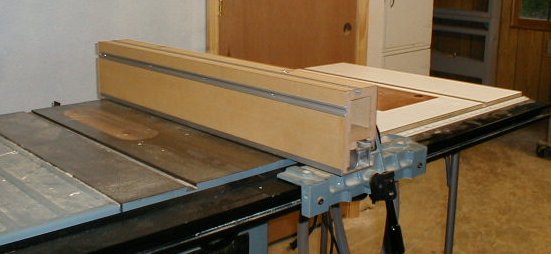 Building the fence Construction of the fence is relatively simple, as seen in the diagram, below. However, there are a few things about this fence that are critical to get right: 1. The front face the fence (A) must be perfectly even with the front edge of the Unifence (U). If it is not, then readings on the Unifence rule will be inaccurate. 2. The front face must be 90 degrees to the table. 3. The top face must be parallel to the table (if you intend to build jigs to ride on the top of the fence). Directions 1. Cut your 3/4" stock to size for parts A-D. I used MDF...the Bigafence is much more useful if it is straight. 2. Cut the dadoes and rabbets in A-D, except for the tiny rabbet at the bottom of A. Note that the exposed dadoes on A and C are optional - cut them only if you intend to intall t-track. 3. Note the bevel on B. This is required to clear the edge of the Unifence carriage...it may not be necessary on all models. 4. Next, drill holes in C and D for the mounting hardware (H1 and H2). Countersink the holes in C for H2. I located them 8" from the ends. Now, dry-fit the parts with some clamps - it's time to start the adjustment phase. I considered listing the exact sizes of the remaining parts and cuts, but I do not know if the Unifence has varied over the years. I think it is better to describe the steps that helped me get a very precise fit. 5. Cut the final rabbet at the bottom of A a little at a time. Gradually increase the depth of the rabbet until the left face of A is even with the left edge of the fence. 6. Once the face is even, we need to work on the angle of the fence face to the table. You can adjust it two ways, by increasing the width of the rabbet in face A or knocking a little off the bottom of B. The goal is to get the face 90 degrees to the table. 7. Now that the face is even with the left edge of the fence and perpendicular to the table, we are ready to adjust part E. The purpose of E is to prevent the Bigafence from sliding to the right on the fence. We should not rely on the force of the bolts to keep it in place - movement during a cut could be very dangerous! Slowly adjust the width of E until it fits snugly in place and the Bigafence cannot move left or right on the Unifence. 8. You're ready for the glue-up. I recommend gluing the parts and clamping it while installed in position on the Unifence - and ensuring that the face is perpendicular to the table. 9. Finally, to make the top perpendicular to the face, run face C across the jointer. Make sure face A is firmly against the jointer fence. 10. Install the t-track in the dadoes in A and C (optional). 11. For a finish, I simply waxed the visible surfaces. 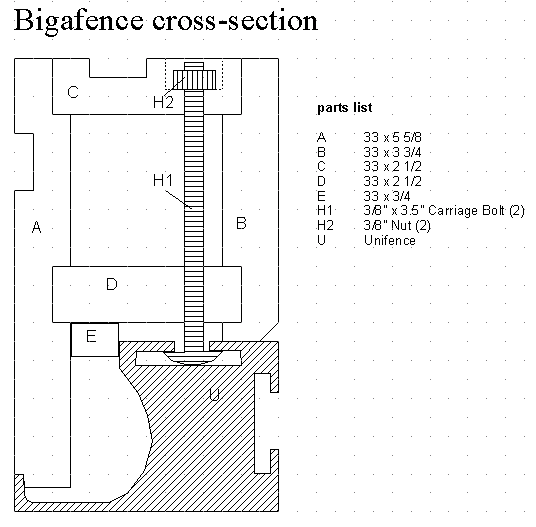 |
